
Docusign eVault Integration
Connect a Docusign account to Concord eVault so every completed envelope is imported into the target vault as an authoritative copy.
Authoritative copy imports are destructive and leave only a copy in Docusign. When eVault imports a completed envelope as an authoritative copy, the authoritative original is transferred out of Docusign. What remains in your Docusign account afterwards is not the official, legally controlling version. From that point on the authoritative copy lives in eVault, and the transfer cannot be reversed from the portal.
If you need a local copy of an imported document for your own records, ask Concord Support about Certified Prints. If you want eVault to import envelopes without taking the authoritative copy, see Docusign: Non-Authoritative Copies.
Before you begin: You need admin access to both the Docusign account and the eVault organization. Your Docusign account must also have authoritative copies enabled. Without it, completed envelopes will not import as authoritative copies. The integration uses Docusign's SOAP API to retrieve authoritative copies, so an app password is required. eVault supports multiple Docusign accounts connected to a single organization.
Four parts, roughly 20 minutes end to end:
- Part 1: Collect five values from Docusign: admin email, app password, Account ID, Integrator Key, and Account Base URI.
- Part 2: Add the Docusign account in eVault and map folders.
- Part 3: Configure the Docusign Connect webhook.
- Part 4: Send a test envelope end to end.
Part 1: Collect Docusign credentials
Step 1: Open Docusign Admin
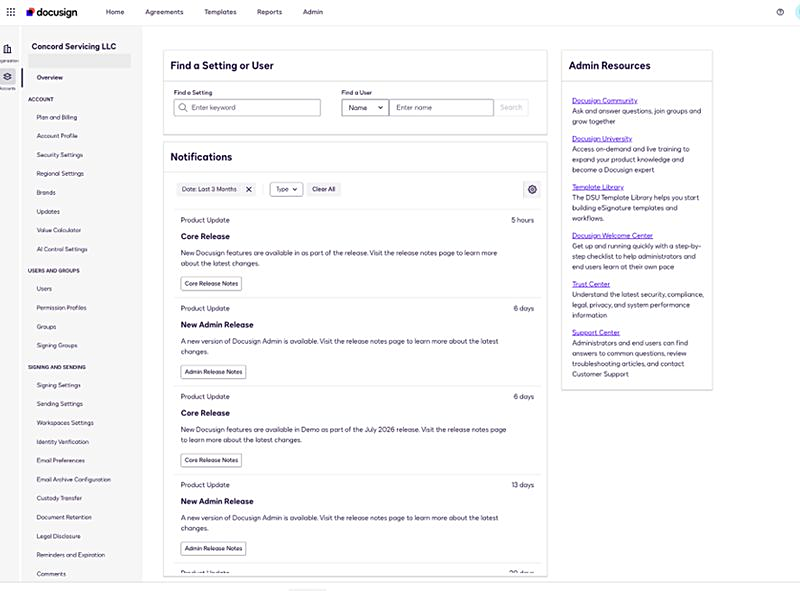
Sign in to Docusign and open the Admin section. You should see the admin landing page with Find a Setting or User, Notifications, and Admin Resources.
Step 2: Open Manage Profile
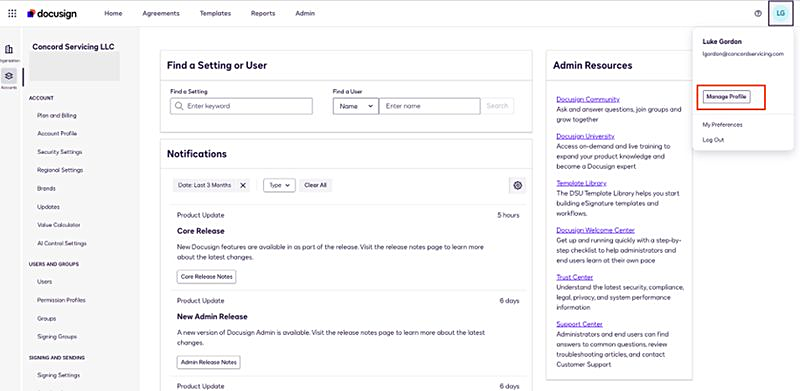
Click your user avatar in the top-right of the header and select Manage Profile.
Step 3: Generate an app password
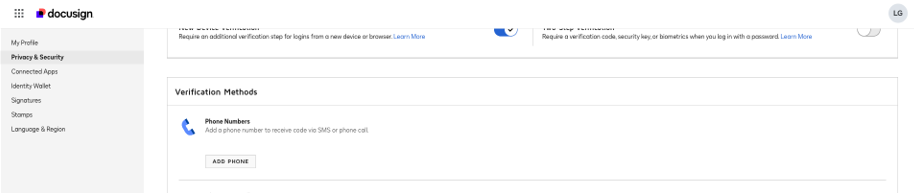
In your profile, open the Privacy & Security tab and scroll to Additional Security → App Passwords. Click Generate App Password.
Give the password a Custom Name (e.g. eVault-prod) and click Generate App Password.
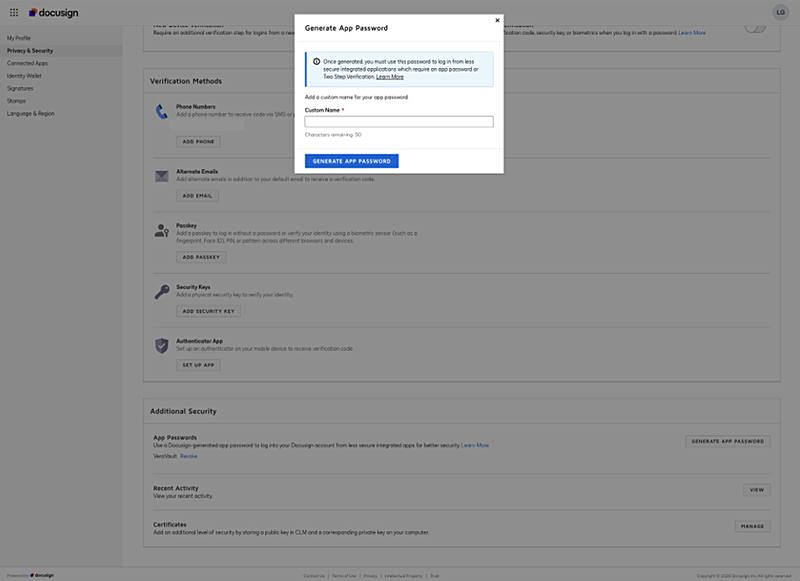
Copy the password immediately. Docusign shows it once. If you lose it, you'll have to revoke and re-issue.
Step 4: Create an integration key
Back in Admin, open Integrations → Apps and Keys. Click Add App and Integration Key, name it, keep defaults, and save.
Step 5: Copy the Account ID and Integrator Key
Copy the API Account ID from the My Account Information panel and the Integrator Key from the row for the app you just created.
Step 6: Copy the Account Base URI
While you are still on Apps and Keys, copy the Account Base URI. eVault needs it to know which Docusign environment and region hosts your account, because Docusign serves different accounts from different domains.
The value is a host name with nothing after it, for example https://ca.docusign.net. Demo and developer accounts use https://demo.docusign.net.

Check that the Base URI matches the account you are connecting. A demo account and a production account are separate Docusign environments, so a production integration pointed at https://demo.docusign.net will not find your envelopes.
At this point you should have five values:
- Docusign username (your admin email)
- Docusign app password (from Step 3)
- API Account ID (from Step 5)
- Integrator Key (from Step 5)
- Account Base URI (from Step 6)
Part 2: Add the Docusign account in eVault
Step 7: Open the Docusign integration page
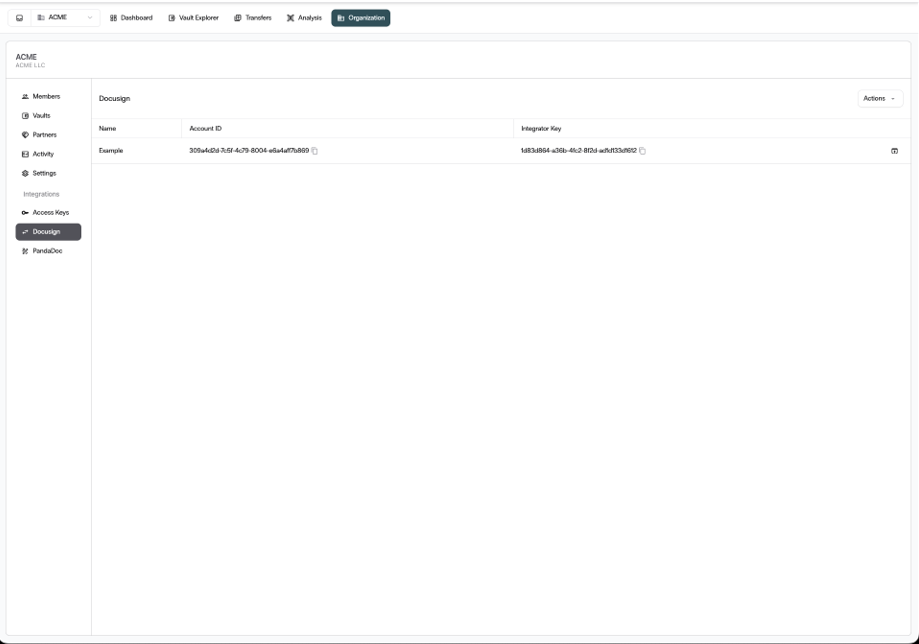
In eVault, go to Organization. In the left sidebar under Integrations, click Docusign. On a fresh org the page shows an empty accounts list.

Step 8: Add the account
In the Add Account dialog, fill in:
- Name - a friendly label (e.g. "Concord Production").
- Username - the Docusign admin email.
- Password - the app password from Part 1.
- Account ID - the API Account ID.
- Integrator Key - the Integration Key.
- Account Base URI: the Base URI from Part 1.
Click Create. The account appears in the list.
Step 9: Map folders
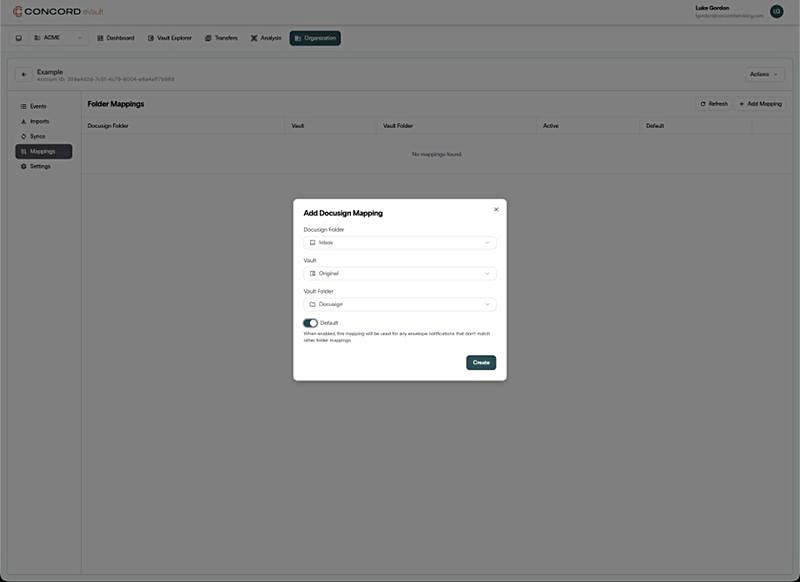
Click the account row to open it, then Mappings in the left sub-nav. Mappings tell eVault which Docusign folder feeds which vault folder.

In the Add Docusign Mapping dialog, choose:
- The Docusign Folder envelopes come from (typically Inbox).
- The target Vault.
- The Vault Folder inside that vault.
- Toggle Default on for at least one mapping - this catches envelopes that don't match a more specific rule.
Click Create.
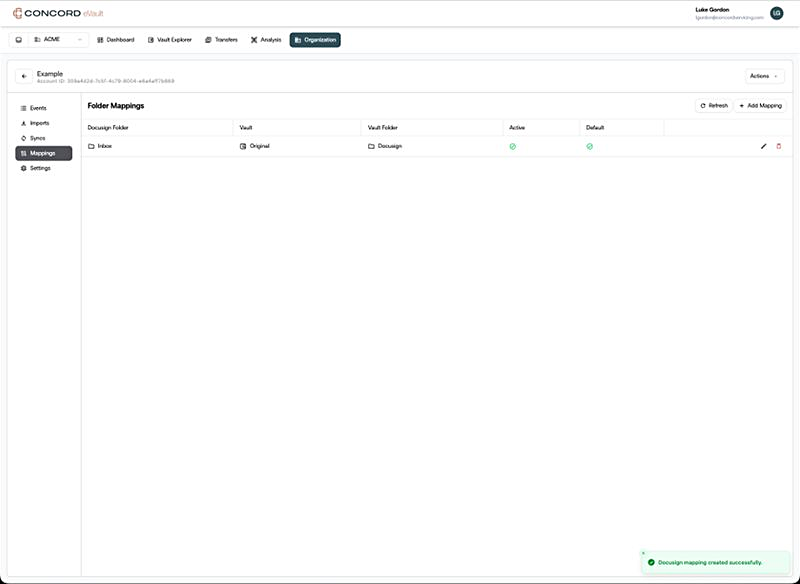
The saved mapping appears in the list.
Part 3: Configure the Docusign Connect webhook
Docusign Connect is the push service that tells eVault when an envelope is completed. Without it, nothing imports automatically.
Step 10: Open Docusign Connect
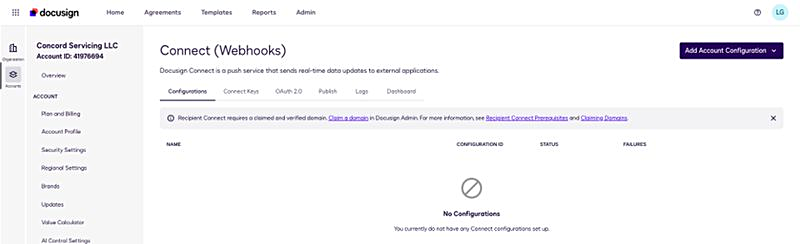
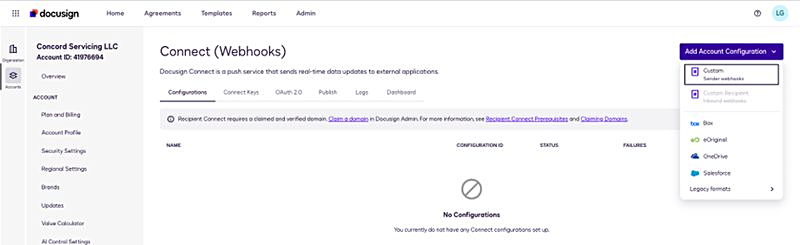
In Docusign Admin, open Integrations → Connect. On a fresh account the Configurations tab shows No Configurations.
Step 11: Add a Sender Webhook
Click Add Account Configuration in the top-right and pick Custom → Sender webhooks.
Step 12: Configure and save
Fill in the Custom Configuration form:
- Name:
Concord eVault. - URL to publish:
https://evault.concordapps.com/api/docusign/webhook - Under Envelope and Recipients → Trigger Events, check Envelope Signed/Completed.
- Under Include Data, check both Custom Fields and Folders. (eVault relies on custom fields such as Account ID, Customer Name, Document Type to route packages, and needs Folders to match against your mappings.)
Click Save Configuration.
Tip. If Recipient Connect requires a claimed domain, you'll see a banner at the top of the Connect page. Sender webhooks don't require it, but claim your domain before rolling out Recipient Connect.
Part 4: Test the integration
Step 13: Send a test envelope
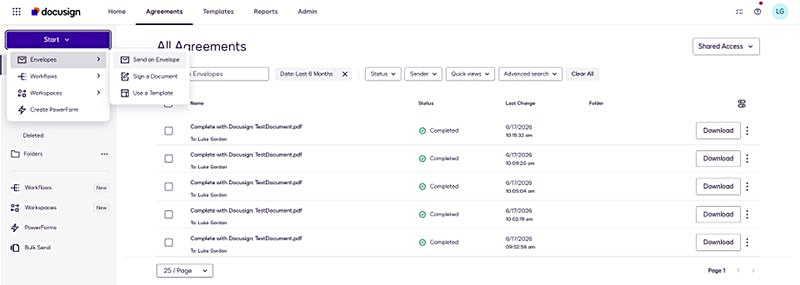
In Docusign, open Agreements, click Start in the top-left, then Send an Envelope.
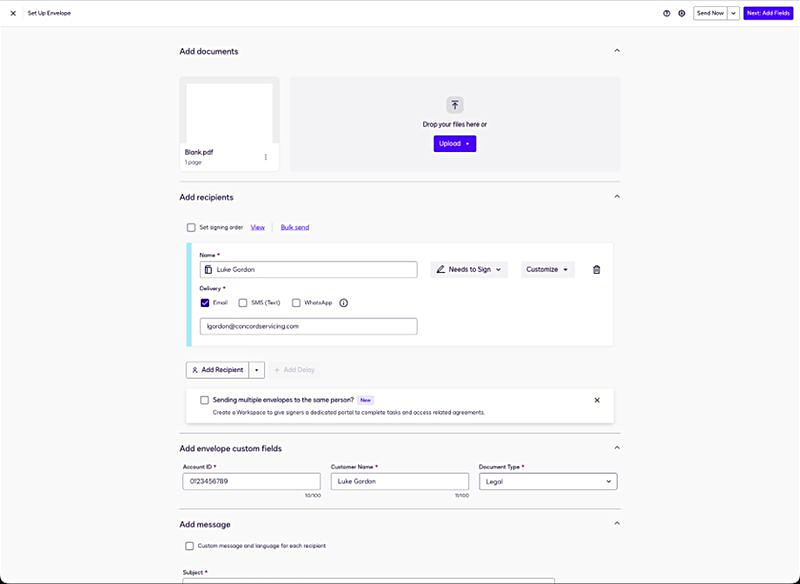
On the Set Up Envelope screen, upload a test document (a blank PDF is fine), add a recipient, and fill the custom fields (Account ID, Customer Name, Document Type). These are what eVault uses to route the imported package.
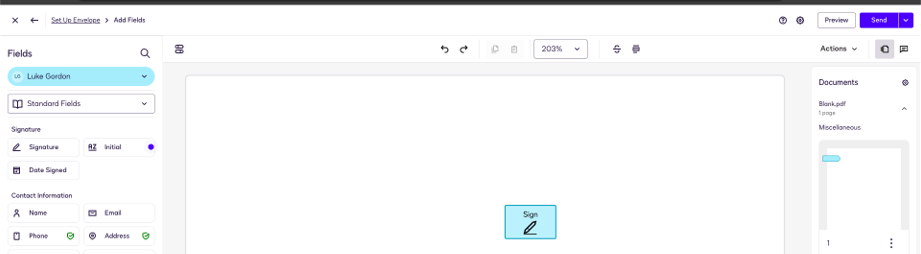
Click Next: Add Fields and drop a Signature field on the document.
Step 14: Sign and complete
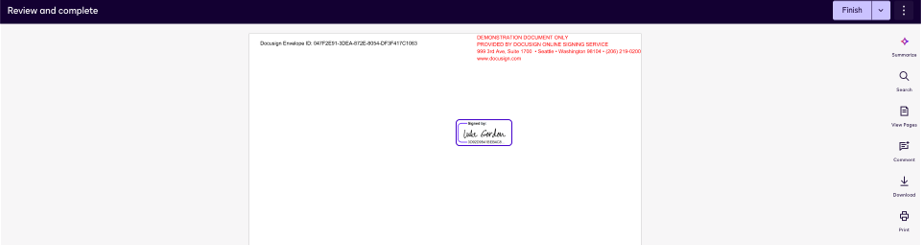
Open the recipient email, click Review Document, sign, and click Finish.
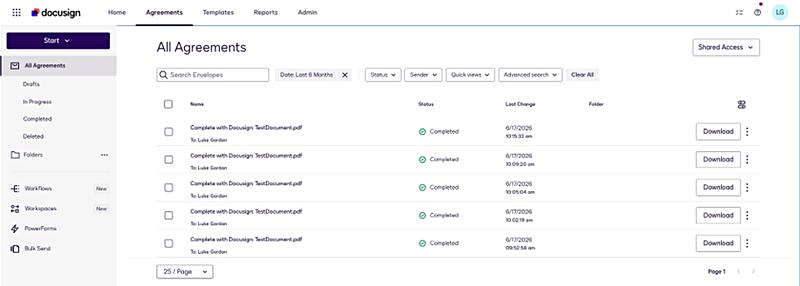
The envelope moves to Completed in All Agreements.
Step 15: Verify in eVault
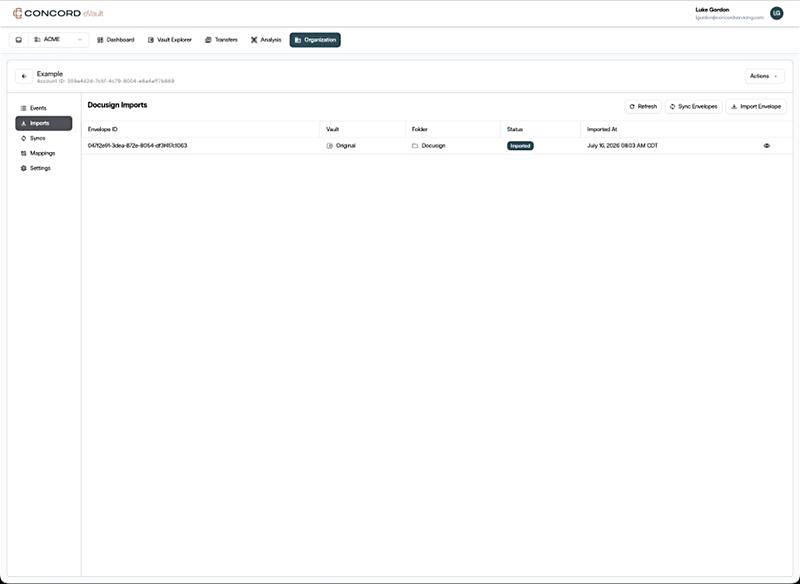
In eVault, open the Docusign account and switch to Events. The webhook event should be listed with Processed status within a few seconds.
The Imports tab shows the same envelope with status Imported.
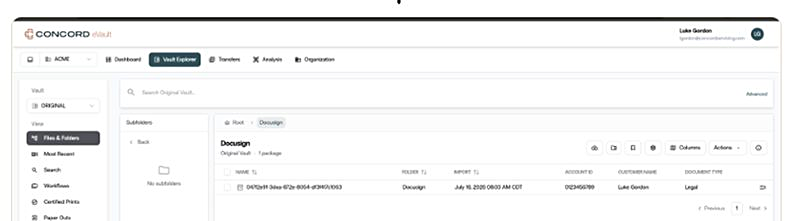
Navigate to the mapped vault folder in Vault Explorer - the envelope is there as a package.
Bulk envelope imports
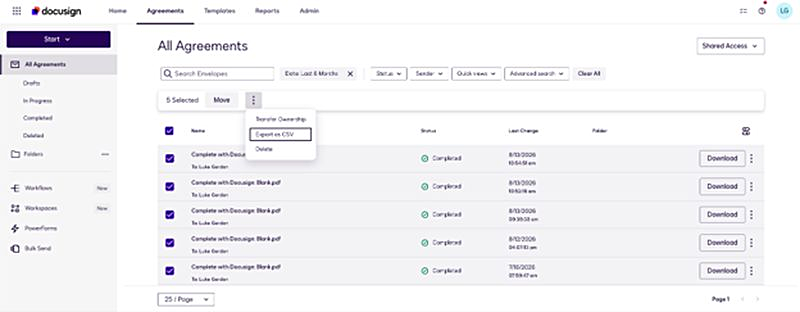
Concord eVault supports bulk imports of envelopes from Docusign via a CSV file. Use this when you need to import many envelopes at once instead of one at a time.
Prepare the CSV
Export a CSV of the envelopes you want to import from Docusign. If you build the CSV yourself, it must include an EnvelopeId column — Concord eVault uses this to identify each envelope.
Import the CSV
In Concord eVault, open the Docusign account and navigate to the Imports (or Syncs) page. Click Import Envelopes.
In the Docusign dialog, switch to the Upload CSV tab and select the CSV you exported from Docusign (or created yourself). You can also specify the vault and folder in your organization to import the envelopes into.
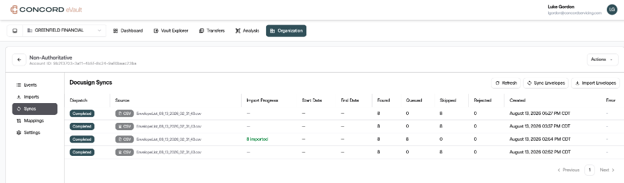
Click Start Import. You'll be redirected to the Docusign Syncs section, where you can monitor the progress of the CSV file being processed.
To respect Docusign rate limits, large CSV files may be processed over the course of several hours. See Docusign call limits for details.
Monitor imports and exclusions
Click a file name on the Syncs page to filter imports and exclusions to that specific sync on the Imports view. A filter chip indicates the imports have been filtered.
Open the Exclusions tab to see which Docusign envelopes were not imported and the reason why. Envelopes that were already in this account (from a prior sync or a live webhook) come back with Already imported - they aren't re-ingested.
Troubleshooting
Envelope didn't import
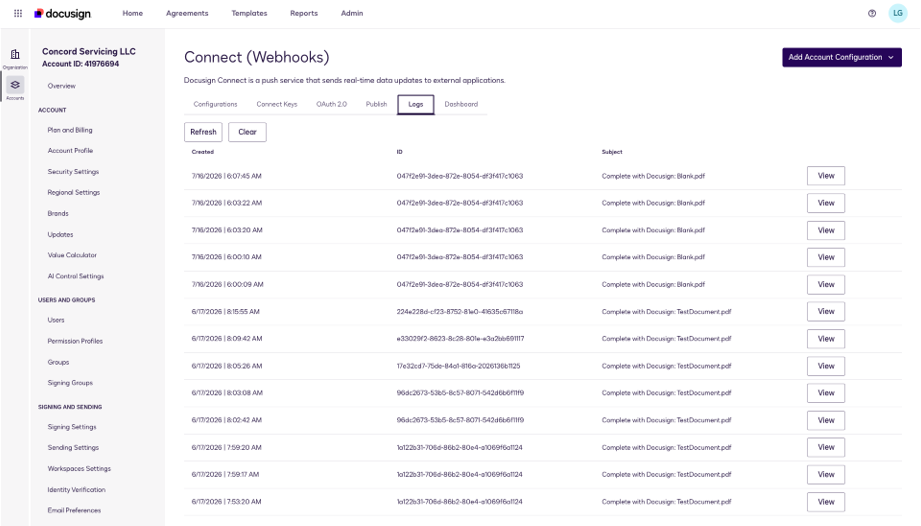
First check Docusign's side: open Connect → Logs. Every fired webhook attempt is listed with envelope ID, timestamp, and result. If the row is missing, Connect didn't fire (usually because the trigger event or filter is wrong). If the row shows a non-2xx response, eVault rejected it - copy the envelope ID and check Events in eVault next.
Retry a webhook event
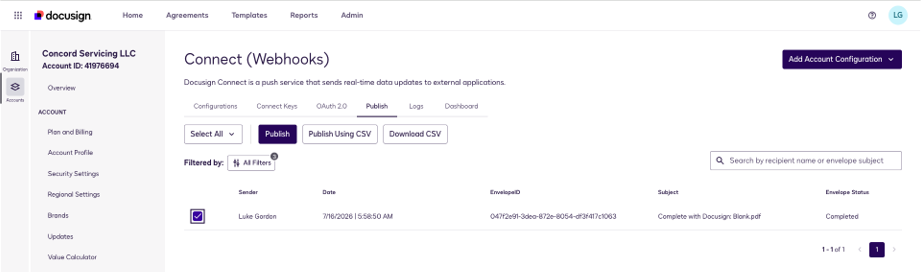
Open Connect → Publish, filter to the envelope(s), select them, and click Publish (or Publish Using CSV for a big batch). Docusign re-fires the webhook to your Connect URL.
Import a single envelope by ID
If you have the envelope ID and don't want to build a CSV, use Imports → Import Envelope → Single Envelope and paste the ID. eVault fetches the completed envelope from Docusign and drops it in the mapped folder.
Webhook event stuck in Processing
Refresh the Events page after a few seconds. If it stays in Processing beyond a minute, contact Concord Support with the envelope ID - most commonly the target vault mapping is missing or inactive, or a required custom field is empty.
Envelope went to the wrong vault or folder
The mapping is evaluated when the webhook arrives. Fix the mapping under Mappings, then use the Retry a webhook event steps above to republish. Existing packages are not moved automatically - move or re-file them by hand if needed.